Telescopes and Optics
Telescopes
Telescopes are easy if you don't look too hard!
At the most basic level, telescopes really aren't very hard to
understand. All they do is squeeze a large image from the external
world into a ray packet small enough to enter your eye's pupil. As a byproduct of this
operation, they intensify the light, making dim light readily visible.
When light intensification is a problem various filters and diversions
drain the excess light.
The main objectives [the principle light collector] of optical telescopes come in three basic flavors:
- Dioptric telescopes [usually called refractors] gather and focus light with a large lens at the entry to the telescope.
- Cataoptric telescopes [usually called reflectors] employ a large mirror at the rear of the telescope to gather and focus light.
- Catadioptric telescopes use a meniscus lens at entry to collect and defocus light and a mirror in the rear to focus the light.
There are a great many other types of telescopes. Light is not the only portion of the electromagnetic spectrum which interests astronomers. Every frequency from the longest wave radio, through microwaves, infrared, visual, ultraviolet, xray on to the extremely shortest wavelengths are collected. Even particles like neutrinos and gravity waves are being used in experimental telescopes. Some very novel detectors are required for these exotic forms of radiation.
Radio signals range from millimeters to many kilometers in length. For example the important 21 centimeter frequency is some half million times longer than visual light. To achieve the same resolution as our telescope, a single parabolic radio mirror would have to be larger in diameter than the Earth.
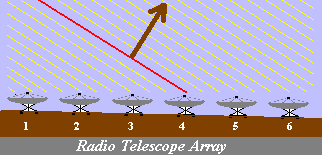 Where a single parabolic
mirror will not work, an array of mirrors will work. It is possible to combine the
signals so that the resolution of the array is equivalent to a single dish as large as the
distance between the most distant parts of the array. Such an array is an example of an
interferometer. In our example, the radio wave noted in red is just encountering station
4. A few microseconds earlier it encountered station 5 and in turn a few microseconds
earlier than this the wave encountered station 6. The wave will subsequently pass over
stations 3, 2 and finally 1 in intervals of a few microseconds.
The time differential between stations δt can be used to determine
the angle θ to the radio object along the dimension of the line of antennae:
where a is the distance detween individual antennae. In order to determine more than a one dimensional direction, at least one other line of antennae in another direction is required. Two directions allows us to determine the Right Ascension and Declination of the object. Multiple antennae in each direction allow increased resolution. If the waves passed over each station at the same instant, the radio star would have to be directly overhead. If the waves passed over each station exactly the distance light takes to travel between each station, the star would have to be on the horizon at the end of the array.
The size of the array can be as large as the Earth. Receivers on opposite sides of the Earth can record the time of the pulse using atomic clocks. With this technique (Very Long Baseline Inteferometry), radio stars are now known more precisely than optical stars. Currently arrays of optical telescopes are being created (Keck I & II, and the 4 large telescopes at Cerro Paranal) which use the techniques pioneered by radio astronomy to extend the resolution of optical instruments. We can expect resolutions at optical frequencies hundreds of times the resolution of single instruments of the same size in the very near future.
Near infrared radiation is easily focused by the same telescope mirrors used for light. Since the wavelengths are longer than light, a given telescope yields a less crisp picture in the infrared than in the visual band. Infrared is very susceptible to absorption by water vapor in the air. This is why most infrared astronomy must be done at very high elevation (or in space) in very dry parts of the world.
The farther parts of the infrared spectrum require novel devices for bringing rays to a focus. Glass becomes opaque at longer wavelengths. You may have noticed that closing a car window has the effect of reducing the heat [infrared] you feel from the Sun. Instead of using lenses, the optics of far infrared telescopes rely on things like focusing mirrors. Far infrared telescopes suffer another huge problem. They operate at frequencies which are the same as the frequencies at which room temperature items emit radiation. Imagine using a lighted fluorescent tube as your telescope's tube. This is the type of problem facing infrared astronomers.
The near ultraviolet can be focused just like light. However short wavelength ultraviolet and the soft xray spectrum simply pass right through normal telescopes without being focused. Short ultraviolet and xray frequencies requires novel techniques to bring their rays to a focus.
Hard xrays, gamma rays and solar and cosmic ray particles are so energetic that they actually cause the metal in the mirror to sputter and evaporate. Very special telescopes using a technique of "grazing" [bouncing radiation at very oblique angles] are required.
All of these non visual telescopes will not be considered.
Refractors
Certainly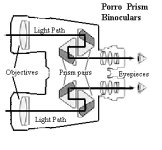 the most common
"telescope" in the world is a pair of binoculars. Binoculars are actually pairs of
refracting telescopes with the addition of two "porro" prisms which act like mirrors.
These prisms serve two primary purposes - they allow the objectives to be offset from the
eyepiece axis and the prisms increase the focal length without drastically lengthening the
binoculars.
When the objectives are in line with the eyepieces, the diameter of the instrument cannot be greater than the distance between your eyes or about 1.5 inches. Opera Glasses, Lorgnettes and very cheap kids "binoculars" are created this way. You might wonder why prisms are used to bend the light path. It would seem that mirrors would do the job just as well. In fact, some cheap binoculars are created this way. Unfortunately, four mirrors in each path result in lots of ways to get the image miss aligned. In addition, prisms are not subject to odd internal reflections. Prisms reflect 100% of the light internally which makes them very effective.
Binoculars are a great favorite of many of the Frosty Drew Staff. Several of us have bough unusually large binoculars with large objectives. These binoculars have particularly fine light grasp making them ideal for dim extended field objects. The Pleiades, The Hyades, Praesepe, the Great Nebula in Andromeda are only a few of the objects which actually are better in large binoculars than telescopes.
Binoculars generally have two or three descriptive numbers. The first numbers is the magnification factor. The second number is the size of the objective. If a third number is given it is either the field of view at a thousand yards or the field of view in degrees. You can switch back and forth between these numbers by multiplying or dividing by 52.5.
Very large magnifications (above 10 or 12) in binoculars means than it will be difficult to hold the binoculars steady without a tripod. The larger the objective, the dimmer objects you can see. Anything less than 35 mm is probably not a very good choice for astronomy. 50 mm is quite good, and 63, 70 and 80 mm objectives are excellent. One superb binocular that uses a volcano as a tripod has a truly astounding 10,000 mm pair of objectives. However, I doubt anyone's purse is likely to run to another pair of Keck telescopes.
 The refractor design is
most popular telescope in the world after binoculars. The reason for its popularity is
easy to understand, they are rugged and maintain alignment better than almost any other
telescope. They are adaptable for all sorts of activities such as sighting scopes,
spotting scopes, terrestrial viewing, and astronomical viewing.
One supposed advantage of a refractor over reflectors is the lack on a central obstruction in the light path. However, any loss to a secondary mirror is more than made up by the fact that large mirrors can be supported from the back side. Large lenses must rely on their rims for all their support. No successful refractor greater than 1 meter has ever be built (the Yerkes Telescope). Large unsupported glass lenses bend under their own weight resulting in distorted images.
Another reason why large telescopes are reflectors is cost. Mirrors are cheaper to manufacture than lenses. Mirrors need only one surface formed rather than four surfaces (both sides of the convex and concave lens). Large glass discs for mirrors can be chosen for the resistance to thermal expansion and warping. The glass can be translucent or even opaque. In fact, some reflectors were made entirely of metal. Refractors must chose glass for its optical qualities. Unfortunately, the best optical qualities, the best strengths and the best temperature insensitivity are not found in a single type of glass.
Reflectors
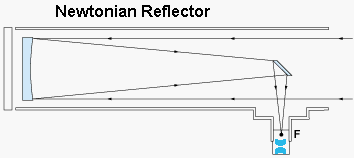 The Newtonian telescope is
the first and the simplest of the reflecting telescopes. Sir Isaac Newton was certainly
the greatest physicist prior to the 20th century and to this day and the greatest
Euclidean geometer of all times. Along with Leibnitz, Newton created Calculus. It was as
a byproduct of his mathematical studies that he realized that a parabolic surface would
form a focused image at least as well as a lens. To prove his point, he formed a small
reflecting telescope out of speculum (a tin/copper alloy).
Speculum takes a very good shine and works well as a mirror. However, since it is largely silver, it tarnishes easily. After re-polishing a few times the carefully manufactured surface is eroded degrading the telescope. It wasn't until later developers realized that you could make the mirror out of glass and deposit a very thin layer of silver by chemical means that reflectors became practical. Silver mirrors still tarnish, but astronomers simply dissolve the old silver coating with acid and deposit a fresh coating of silver.
Aluminum is almost as shiny as silver. In the violet end of the spectrum aluminum actually outshines silver. However, metallic aluminum was one of the rarest metals on earth until late in the nineteenth century. It combines very readily with other chemicals to form almost totally inert molecules. Until the availability of large amount of electrical power, there was no way to separate the aluminum from its captors.
Today most telescopes use aluminum as the reflective metal. Pure aluminum when it "tarnishes" forms aluminum oxide, a totally transparent and very tough surface coating. The first layer of aluminum atoms is oxidized protecting the shiny layers below.
The Newtonian scope has been a favorite of amateur astronomers for more than a century. Easy to construct, simple to operate and less costly than any of its brethren, the Newtonian is a winner. The two most popular forms of the Newtonian are the Dobsonian and bowling ball mount designs. Essentially the same, these mounts keep the Newtonian low to the ground and stable.
The biggest drawback to the Newtonian design is the placement of the eyepiece. In smaller scopes, this isn't much of a problem, but in larger scopes, the eyepiece may wander all over, requiring a step ladder and contortions.
Two lesser drawbacks are vibration and balance. Newtonian have the eyepiece or instrument package at the front at the end of a long lever arm. Heavy counter weighting is required at the back to balance these tools. Changes in eyepieces or instruments requires re-balancing. Touching the scope or wind is very likely to set up major vibrations.
 One way that Newtonian
scopes have been modified is by installing a camera at the prime focus. This has the
advantage that fewer lenses, prisms, and mirrors are in the light path. Each optical
element causes some light to be lost. Newtonian cameras make use of every available bit
of light. They are very effective as long as the camera diameter does not cause an
unacceptable central obstruction. Oddly enough, this central obstruction can be quite
large in huge telescopes. Astronomers used to ride head downward at the prime focus of
the Palomar 200" telescopes. When conditions were right they photographed their target.
The idea of hanging upside down for hour unable to squirm or wiggle because a photograph
would be ruined is something that no one would accept today.
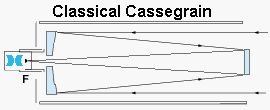 The Classical Cassegrain
telescope has a parabolic primary mirror and use a hyperbolic secondary mirror that
reflects light through a hole in the primary. The advantage of this design is that
instruments remain near the base of the telescope, subject to less vibration or balance
problems. The hole in the center of the primary mirror doesn't affect viewing because
this area would be shielded by the secondary mirror in any case.
The obstruction in the center of a reflecting scope, whether it is a 45º secondary flat mirror, a camera cell or a Classical Cassegrain's hyperbolic mirror disturbs many telescope designers. With certain eyepieces this secondary mirror appears as a dark central smudge which makes that eyepiece undesirable.
A variety of modifications have been made to try to avoid this problem. Most of these are based on tilting the primary so the light passes through the side of the telescope. Nothing blocks light within the barrel of the telescope. This sounds ideal, but the tilted mirror produces horrible distortions.
It is possible to carefully distort the mirror so that the distortion in the mirror partially cancels the distortions caused by tilting the mirror. A secondary with a set of opposite distortion tilts the light back again further reducing the distortions. Sometimes designers try to use a tertiary mirror to put the focal point at a convenient viewing angle. One such design which gained popularity about 20 years ago was called a "trischiftspielger". Roughly translated from German this a three-shifted-mirror telescope. Grinding the mirrors and collimating (aligning) these telescopes are not for the faint of heart. These problems have severely limited their popularity. Whatever light grasp you gain by avoiding the secondary is easily erased by the increased light gain of a cheaper larger Newtonian.
Catadioptric Telescopes
A few decades ago, it would have been safe to ignore discussing telescopes which combined some of the features of refractors (dioptrics) with reflectors (cataoptrics), but the enormous popularity of these telescopes cannot be ignored. These telescopes tend to be compact where simple refractors and reflectors tend to have much longer barrels. The compactness permits many design choices which are precluded with long barreled telescopes.
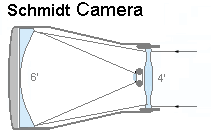 When Palomar was being
constructed, there was a need for a sky survey to support the glass giant. A telescope
designer named Schmidt realized that he could create a very wide angle telescope if he
placed a corrector plate at the entrance of the telescope.
The result looks similar to a Classical Cassegrain shown except that the corrector plate had a much more severe curvature causing the rear mirror to become almost 1.5 times as large as the corrector. In the Palomar design, the corrector is 4' and the mirror is a full 6' in diameter. This system has a 4' objective, in spite of the 6' mirror because the incoming light is constrained to the size of the corrector plate.
A second modification was that there was no secondary mirror and no hole in the primary. The secondary was replaced by a photographic plate. The prime focus in this camera was not flat but parabolic. This meant photographic film had to be bent to be exposed correctly.
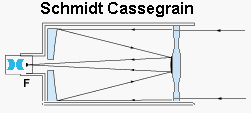 The Schmidt/Cassegrain
design is a mixture of the reflecting and refracting telescopes giving rise to the
ungainly name Catadioptric [mixed optics] telescope. These telescopes are characterized
by a quadratic (sort of a soft lazy W shape) cross section corrector plate and a spherical
large mirror.
The advantages of a corrector plate and a mirror were not lost on the astronomical community. The barrels of a Classical Cassegrain can shrink 4 or 5 times. In turn, this eliminates the need for massive structures to house and turn the telescope. In the 1970s, a California optical company Celestron began to produce 5 and 8 inch Schmidt Cassegrain telescopes which began the current revolution in amateur telescopes. Until then, an amateur could grind excellent Newtonian mirrors. Their cheaper telescopes were often superior to store bought. The complex bi-quadratic corrector plate of the Schmidt Cassegrain required skills beyond almost any amateur. This left the Schmidt Cassegrain manufacture to commercial firms.
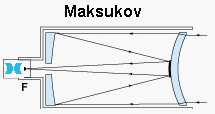 The Maksutov design makes
use of spherical lenses with a very deep meniscus lens corrector. Although the curves in
these lenses and mirrors are very deep (usually something to be avoided because of
grinding and polishing problems), the fact that the surfaces are spherical makes them
reasonably easy to manufacture. Maksutov's tend to make very fine longer focus length
telescopes in very short barrels. Optical path compression factors of 5 or more to 1
without noticeable distortions are common.
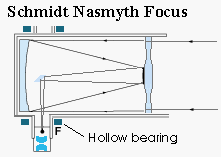 The Naismyth design (shown
here with a Schmidt Cassegrain optical design) is an interesting solution to the problem
of the "wandering eyepiece". Even standard Cassegrain telescopes have the eyepiece move
through a small arc. In the Naismyth design, the eyepiece is mounted so that it looks
through the main declination/altitude bearing. As long as the telescope and the platform
on which the observer stands move as a unit, there is no relative motion of the eyepiece
and the observer as the telescope slews or tracks objects.
This is particularly desirable when very heavy instrument packages replace a viewer. The instruments merely need to peer through the bearing hole without affecting the telescope balance. Variations on the Naismyth design exist.
Mounts in theory
Telescope mounts are a subject unto themselves. They run the gamut from non-existent (hand held binoculars at one extreme and the Hubbell Space Telescope at the other) to the massive and complex. Astronomical mounts must accommodate several attributes which are often at odds with each other:
- Mounts must allow the telescope to be pointed at all required positions.
- The mount must allow the viewer to follow the diurnal motion.
- The mount must be sturdy enough to avoid wobbling and vibrations.
Mounts which are desirable for one type of telescope may create an intolerable problem when used with another type of telescope. There have been many designs offered. Each has good points and drawbacks.
Alt-azimuth
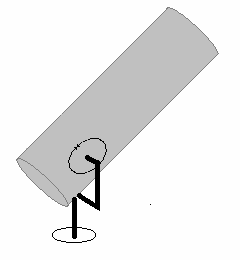 The simplest of all mounts is
the alt-azimuth mount. The center of gravity [C.O.G.] is directly over the base. Some
alt-azimuth mounts limit the zenith by not making the fork long enough to allow the barrel
to swing vertically. This particularly true of refractors mounted in alt-azimuth fashion.
This is the so called terrestrial scope and is ideal for bird watching or looking at ships
on the ocean but is not very good for looking at the stars. A terrestrial telescope can
usually not be tilted to view stars above a certain altitude.
Alt-azimuth mounts designed for astronomical work provide fork arms long enough to allow the base of the scope to clear the yokes cross bar. Alt-azimuth mounts used for astrophotography have a unique problem, the image in the camera spins slowly. This is due to the difference between the equatorial orientation and the zenith orientation. Sometimes alt-azimuth telescopes are not recognized as such. Tripod mounted binoculars, bowling ball mounts and Dobsonians are all alt-azimuth mounts however different they look from a pedestal based fork.
Alt-azimuth forks have two serious drawbacks for SOME telescopes. The first the the problem of image rotation. Because the alt-azimuth motion does NOT follow the sky's diurnal motion, images rotate. This may not be a problem for viewing but it causes streaks on long duration images unless "de-rotators" are used. The other problem that alt-azimuth forks share with ALL fork is fork length. Forks simply are not a good choice for long barreled telescopes. Long arms become weak and wobbly.
Equatorial Fork
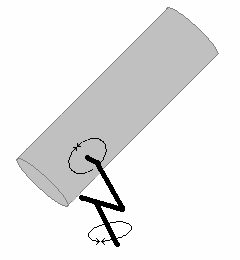 You can convert an
astronomical alt-azimuth mount into an Equatorial Fork mount by tilting the bearing axis
until it is parallel to the at the imaginary line between the South and North Celestial
Poles. Doing this will tilt the fork cross bar so that it will sweep out a plane which is
parallel to the plane of the equator.
Not so long ago every astronomical mount worthy of the name was tilted into the polar/equatorial position. [Most of these mounts were variations of the simple Equatorial or German mounts but the Cross Axis mounts, various forms of the English mount and polar disk mounts are also tipped into the polar/equatorial position.] The polar/equatorial orientation allows a simple clock mechanism to follow the diurnal motion of the sky.
Only recently have the advents of three axis drives (vertical, horizontal and along the axis of the telescope) controlled by computers made alt-azimuth drives practical astronomical mounts.
The worst drawback to Equatorial Forks is a lack of stability. We'll discuss various ways that these problems can be addressed as we discuss yokes below.
English Fork
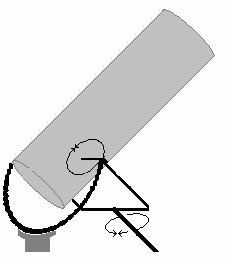 Simple Equatorial Fork
mounts are unbalanced. Several schemes have been developed to place the center of gravity
[C.O.G.] over the main bearing. Failure to balance the torque on the main axle may be
ignored in light weight telescopes, but on heavy telescopes, the main axle will bend,
flex, suffer frictional damage and bind unless the stresses are relieved.
Even small telescopes benefit by being balanced. More than a few compact telescopes have fallen [usually towards the north] because they "hung out" too far over the footprint of the tripod they were mounted on. A technique used by small compact telescopes was the introduction of the wedge. Effectively, the wedge drives the telescope forward so that its C.O.G. is aligned.
A wedge simply isn't practical for heavier telescopes. Heavy stresses will cause the wedge to bend or flex. A better solution is to increase the size of the supported footprint. One of the most popular solutions for large telescopes is to support the upper end of the fork with a semi circular ring [or horseshoe] tilted at angle which place the ring's plane parallel to the Earth's equator. The ring relieves stresses on the main bearing and axle. The C.O.G. falls within the expanded footprint between the ring bearing and the axle bearing.
The worst drawback of an English Fork mount is lack of portability. While few fine "transportable" telescopes have English Fork designs, only the most optimistic amateur would call them easy to set up.
Equatorial and English Yokes

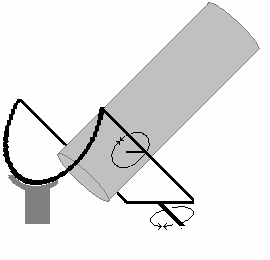
Fork mounts are excellent solutions for compact telescopes. However when used with long barreled telescopes, they present serious problems. As the arms grow in length, extra bracing is required to maintain stiffness. Added weight in turn causes a need for more massive support and drives. Fork designs have a natural tendency to tip at the unsupported end. Long arms are very sensitive to vibrations.
Yoke designs are a solution that may be used to support the upper end of what would otherwise be a fork. Both Equatorial Yokes and English Yokes can be found in some of the older large observatories. Conceptually, they are similar to their fork counterparts, but they may resolve engineering problems that cannot be accommodated by forks. One large advantage of yokes over forks is that the supported footprint enlarges. If heavy instruments are likely to be placed at the rear of the telescope, a yoke may allow the C.O.G. to be covered by the supported footprint where a fork would fair.
Telescopes must be tilted at ever more severe angles as you approach the equator. Near the equator any kind of a fork [except an alt-azimuth] becomes extremely unbalanced. A yoke may be the only possible solution for a polar/equatorial alignment.
The worst drawback of a Yoke is that two cross bars exist. Even if they do not limit the swing of the telescope, polar regions are excluded because the support and cross bar are in the field of view. NOTE: The 200" Hale telescope on Palomar mountain is a variant on the English Yoke design.
Polar Disk Mount
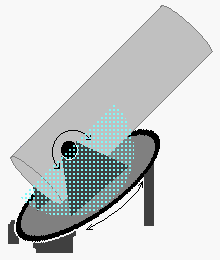 The Polar Disk is an
extreme version of an English Fork mount. The ring now slips down until it replaces the
cross bar of the English Fork design. The ring [or horseshoe] of an English Yoke is
filled for extra rigidity. The arms of a yoke are usually replaced by a wedge (shown as
shades of gray). In some variants, the arms are completely replaced by a pivoting
semi-circle (shown as hatched sky blue).
The Polar Disk design with a pivoting semicircular "arm" was ideally suited for systems which required large mechanical setting circles. For non digitized system (manual and mechanical), large precise setting circles make finding a precise point in the heavens a good deal easier. Combined with a micrometer scale, large setting circles could point with nearly arc minute accuracy. Of course, the advent of digital setting circles has made large setting circles nearly obsolete.
Oddly enough, the attempt to install clock drives on Dobsonian mounts has revived the polar disk design from obscurity. Aligning the base of a Dobsonian with the plane of the equator and pointing the main axis parallel to the axis of the earth, converts a Dobsonian into a polar disk arrangement. The box of the Dobsonian mount replaces the wedge in the diagram.
German Equatorial Mount
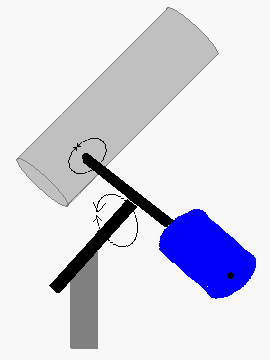 German mounts allow long
barreled telescopes to point at all or almost all points in the sky. These mounts are
asymmetrical. With all the weight of the telescope on one side of the mount, the
counterweights on the other side are crucial. Relying simply on mechanical strength in
the arms to hold the telescopes weight might work for a very small telescope but are
impractical for large telescopes. It is interesting that no large telescope created in
the last few decades has attempted either a German or an English Cross Axis mount design.
I have a personal grudge against "department store" German mounts. They "look scientific" to many prospective buyers who lack an understanding of this design. Perhaps a better term for "looks scientific" would be "looks complex". Unfortunately, complex does not mean better. I've seen too many kids and their frustrated parents wrestling with these mounts in the dark. These mounts are difficult to align and balance and really should be left for people who understand them.
Having momentarily railed against the "department store" German mount, let me say something in the German mount's favor. It is perhaps the best mount available for long barreled telescopes. A yoke or a fork design able to handle a 10 meter long barrel would be huge. Slender yokes and forks able to handle such barrels would either have to severely limit the swing of the barrel or would be subject to bending and flexing.
The largest refracting telescope in the world, the Yerkes telescope, has a very tall pedestal, long barrels and a German design mount. While appropriate to this telescope, the huge dome mounted on a tall cylinder looks more like a hay silo for babe the Blue Ox [Paul Bunion's companion] than an observatory.
Cross Axis Equatorial Mount
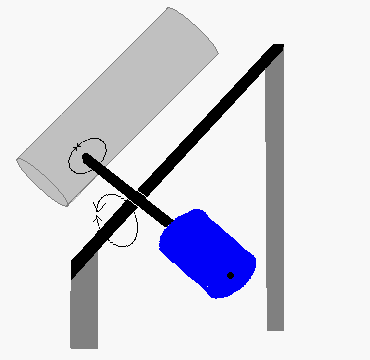 The Cross Axis Equatorial
Mount is an attempt to relieve the severe torque on the pedestal axle and bearing. The
requirement for two pedestal makes this design less portable that a standard German mount.
However, one telescope sometimes seen at Frosty Drew Observatory uses this design with a
very compact refractor. For people who set up telescopes in the dark, the long shaft can
be an advantage. An approximate polar alignment can be achieved by simply sighting along
the main axis.
Other Mounts
The list of mounts we have given is by no means exhaustive. For example, there are mounts which do not allow movement along the azimuth. These mounts are called transits. The very first astronomical observatory in North America was dedicated to a transit telescope. Once these telescopes are aligned accurately along the North/ South axis they can determine a star's Right Ascension with great accuracy. Prior to astronomy, determining a star's Right Ascension allowed accurate table for sailors to be created.
As we shall see in the next section, even when the basic design may fall within one of the categories above, the ways that this design can be implemented may run the gamut from ridiculous to inspired.
Mounts in Operation
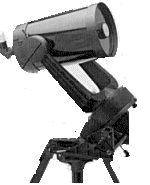 The picture to the right
shows a sensible use of a fork. This Celestron telescope uses a wedge to achieve
the correct polar angle for an equatorial mount. This wedge has the beneficial effect of
offsetting the telescope such that the center of gravity rests over the tripod. Without
this feature, the weight of the telescope would tend to tip the telescope backwards.
Probably no mount confuses the first timer more than the German mount.
German mounts are asymmetric supports which require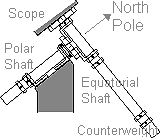 the user to counterbalance the telescope with substantial weights.
The major advantage of this type of a German mount is that it will allow
a long barreled telescope to rotate completely without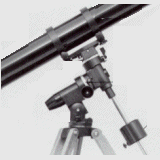 obstruction in both the right ascension and declination. To avoid vibrations
and bending, the shafts of a German mount must be very stiff and large. German mounts
were among the first to be motorized. It is possible to track any star by simply
attaching a gear to the polar shaft and connecting it to a clock drive set to sidereal
rates. The earliest German mount drives were pulley driven with escapement mechanisms
which allowed weights to slowly turn the telescope as the sky moved. The example to the
left shows a refractor connected to a simple German mount. One unfortunate thing about
German mounts is that they "look scientific". Lots of first time buyers purchase one when
a simpler mount would suit them better.
At one time, no self respecting amateur astronomer would consider owning an alt-azimuth telescope. We used to say "Leave those mounts to sea captains, we don't want them!" There were several reasons why this made sense then, but no longer makes sense now. Alt-azimuth telescopes without wedges or offset mechanisms can't point anywhere near the zenith. The tripod gets into the way. A simple clock work mechanism is not sufficient to track the stars. Most telescopes that were placed on alt-azimuth mounts were long barreled. This meant that for stability, any fork was limited in the range through which the telescope could be tilted.
However, several advantages exist for alt-azimuth telescopes. First and most significant is that the alt-azimuth design is inherently strong and stable. The weight is placed directly over the support. Counter weighting the telescope is not required. The very fact that both the altitude and azimuth must be separately driven, means that such telescopes can be used to track non stellar objects as easily as stellar objects.
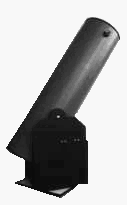 Alt-azimuth designs were also given a new lease on life by two recent developments - the Dobsonian and the
bowling bowl design. Both of these designs are relatively difficult to automate with
clock drives, but they correspondingly are some of the easiest scopes for hand steering.
The Dobsonian is very desirable for larger Newtonian telescopes. The Dobsonian is one of
the simplest mounts which amateurs can create. Basically, they are a turn table, an open
ended box with large circular bearings cut (usually lined with Teflon or equipped with
roller bearings) and two large wheels to which the scope is mounted. The heavier part of
a Newtonian scope (the mirror and its cell) plus any additional weights are down low over
the turn table.
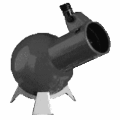 The bowling bowl design has been limited to small wide field telescopes. This design has some notable flaws
( for example you cannot realign a mirror which slips), but their extreme ease of use and
very modest price make them very popular. The large bowling ball end contains the
majority of the weight. The three legged stand has felt pads which allow the scope to
move easily, but still hold it in place. The bowling bowl itself makes the time honored
technique of sighting along the barrel to locate a target all but impossible. One
manufacturer attempts to relieve this problem with a sighting doohicky which bolts to the
scope barrel. This is moderately effective. My two biggest objections to this telescope
have nothing to do with the bowling ball design. The first is the use of a rubber
friction focuser. This is tricky to adjust without moving the scope off the planet or
star cluster. My second objection to this telescope is simply the fact that the
manufacturer wanted to sell an adapter to allow it to mate with a tripod. The three
legged stand cannot be attached to a standard camera tripod with out some sort of an
adapter.
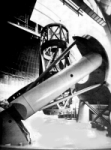 The English yoke design may be the ultimate in stability for equatorial mounts. The simplest version suspends
the scope between the sides of the yoke. The Palomar variation shown here places the yoke
rather far forward, and suspend the scope from two long arms which trail backwards to a
single great bearing at the rear. Notice the huge yoke supported by bearing mounts. When
Palomar was built, designers realized that a substantially larger telescope would cause
such a design to flex unacceptably. The requirements for a huge dome, massive mounts and
a heavy mirror seemed to preclude success with a larger telescope. This idea was only
bolstered by the somewhat ill fated Soviet Astrophysical Observatory in the Caucasus
mountains. At 6 meters (to Palomar's 5 meters) its less than perfect optics made it
undesirable for many applications.
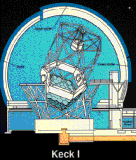 In the 1970s and especially in the 1980s, the advent of computers and equally important the advent of tools like laser
alignment devices, made radical new designs seem feasible. The Air Force had wanted a
satellite mirror. To avoid the possibility that the mirror would be flawed or that it
might be lost on the launching pad, the Air Force ordered at least 6 additional 6'
mirrors. For years they sat unused until Mount Hopkins decided to try a risky design. A
cluster of mirrors would be placed in a ring in an alt-azimuth frame. The telescope
looked for all the world like the cab of a seven story crane without the crane! It used
laser alignment and the telescope was driven in two directions (altitude and azimuth)
jointly. The experiment was a success.
Shortly, this concept was repeated in Hawaii with the Keck telescope which employs 36 mirrors in a frame. From the sketch, you can see that the mount is an alt-azimuth design. The large platforms on either side of the telescope are at the Naismyth focus. Heavy instrument can be mounted here without disturbing the telescope's balance. A simple third mirror which rotates allows instruments for two different activities to each be set up at the same time on opposite sides of the scope. The Keck I telescope can also direct light through a Cassegrain focus where its is joined from light from the Keck II. This increases the effective diameter (at least as far a resolution is concerned) of the world's largest binoculars from 10 meters to about 135 meters.
 The design of a telescope mount does not need to be fixed. The Questar is an example of a design which can be run
in either an alt-azimuth or an equatorial yoke mode. The Meade LX200 16" telescope was
purchased with an alt-azimuth pier at FDO, but it could have been purchased with an
equatorial mount just as well. The main reason for preferring the alt-azimuth mount at
FDO was a matter of our dome's geometry. An equatorial pier would have leaned to the
north. This in turn would have prevented us from installing a rotating platform.
Buying a First Telescope
What?, Where?, When?, Who? and How Much?
This text assumes you are buying a telescope for yourself. If you be buying a telescope as a gift (perhaps for a child) answer these querstions as if you were that person. These five questions really determine the type of telescope you'll need. Depending on the answers radically different telescopes should be purchased. Until you can really answer these questions wait before you waste money on a fine telescope which is totally wrong for the user.
What?
What will be the telescope's primary use?If you answered...- I want to look for cometsthen you should be looking at large binoculars.
- I want to examine deep space objectsthen spend a large portion of your money on larger aperture.
- I am primarily interested in solar system worldsthen you will want a long focus telescope.
- I require ease of finding objects, then you telescope should have GOTO capabilities.
- I will only occasionally use it for the sky, when I'm not bird watchingthen use your spotting telescope on a swivel mount.
- I love astrophotography. I want to photograph galaxies and comets.then you have chosen one of the most demanding of types of amateur astronomy. Your equipment will have to have a mount which is rock solid, with excellent long term right ascension and declination motors. You'll need special filters and either cameras or CCD imagers. You will undoubtedly become a ardent supporter of dark skies and an end to light pollution. You will love and be envious of the marvelous photographs of David Malin and the pictures streaming down from the Hubble Space Telescope.
As you can see, the application requires wildly differing telescopes. One of the worse answers is also the most frequent answer "Everything is equally important to me. I need a general purpose telescope." Unfortunately, even with huge budgets, no telescope answers all requirements. You wouldn't ask for a vehicle with the agility of a sports car, the storage capacity of a moving van, the speed of an Indy car and the ruggedness of an SUV with much hope of a single vehicle supplying all your desires.
One wag said "Is that so? What if you had an 20 meter scope in orbit? Wouldn't that satisfy any amateur's every dream?" Well actually no it wouldn't if the amateur wanted to watch wild life and see ships at sea. Applications matter. Worse yet, one application imposes design limitations that make another application unsatisfactory or even impossible.
When we chose our telescope we had to give up some features to gain others. Our Meade LX200 16" is a series of compromises. While it does nothing perfectly it does many things more than adequately. We had a telescope with somewhat better optics which we traded in for the Meade which has five times the aperture and automation to boot. When we have visitors in a line, the ability to rapidly find and clearly see dim objects is an tremendous advantage.
Where?
Where will the telescope [primarily] be used?If you happen to own a snug home thousands feet above a desert, with the nearest light source hundreds of miles away, then your back yard will do just fine. A fixed enclosure makes lots of sense even if you have a modest telescope. Why travel? You already have an ideal location. However only in my wildest dreams have I ever expected to permanently live in such a paradise. For most of us, transportability is an important issue. Even with our dome, there are times when I would give a lot to be able to move it a few miles inland away from the coastal fogs which dampen the night's festivities.
Sometimes the Where> question's answer indicates a limitation. I am very sensitive to altitude. Above 8,000 feet I have ever more severe respiratory problems. Over days and weeks not only do I not adapt but my breathing gets more labored. I would love to visit the Keck installation at Mauna Kea or Cerra Paranal but they are thousands of feet above my limit. More urgent physical limitation for would be astronomers may require non traditional solutions. A German mount of the right height allows a person confined to a wheel chair access to a rear focus telescope while a 10" Dobsonian/Newtonian would put the eyepiece out of reach. Use a little imagination and you will realize that astronomy can be accessible to people with physical limitations.
This in turn makes several factors important in the telescope. For example if you travel a lot with you telescope (as I do), compactness is very important. A few extra pounds is not nearly so critical as the ability to fit the telescope under the plane seat in front of me. However change a few factors slightly and extra pounds become a major factor. Ever try lugging a 10" Dobsonian to the top of a hill that lacks a road?
If you are a student away at school, a large telescope will probably have to stay home, while even dorms with the worst lacks of space can house a Maksutov.
If you live near an busy major airport, a major city, or an area where highway builders waste countless megawatts shinning light upwards [illuminating the undersides of 747s?] then you will quickly learn about filters or else you will lose interest in observing.
When?
When will the telescope be used? may seem like a strange question. The answer appears to be "Why, at night of course". After a moment you may amend that by saying "Well, I'd also like to look at sun spots". If I went a bit farther and asked "What about the seasons? Will you sometimes want to get up early for a comet or an alignment? Do you plan to use it for looking at scenery as well?"
As you can see, each of these additional questions adds another dimension to the requirements for your telescope. Daytime astronomers need equipment with special filters and small apertures. These special folks talk about things like coronagraphs, hydrogen alpha light, foculae, coronas, magnetic storms and of course sun spots.
Cold weather astronomers need special gear, however you won't find it in an optical shop. Try a mountaineering shop for the warm boots, heavy jackets, warm up pants, gloves, hats and scarves. Have fun looking at Orion and the Trapezium!
Early rising astronomers need equipment which is easy to pack up on a moments notice if they get up and notice the sky is gorgeous. Early risers get to see the skies the rest of us see three months hence. I'd suggest either packing the gear the prior evening or making sure that nothing rattles or jingles.
Who?
Who are you and what appeals to you? Your natural socialability and what you wish to do with the telescope determines what types of telescopes are suitable. Telescopes with delicate features are fine for careful solitary observers. Star Party hosts better have a telescope which can take a fair amount of abuse. I have the best of both worlds by having an excellent but relatively delicate Maksutov and an inexpensive bowling ball wide angle scope that I let children focus and turn to their favorite objects. I leave apature to our 16" Schmidt Cassegrain.
Astrophotography with with crowds of people moving around seldom creates quality images. Even if he or she is naturally gregarious, the astrophotographer seldom works with much company. Anything which causes vibrations or interruption are as welcome as wasps at a picnic.
Some amateur astronomers are attracted to the serenity of an activity which can be pursued alone. Since avid amateurs often spend sizable amounts of money on equipment, it is not surprizing that they may be reluctant to have people bumping into theur equipment in the dark.
Even if you are naturally gregarious, arranging a star party can be a catch as catch can activity. Even at FDO where our docents definitely fall into the gregarious category, we often find ourselves alone on cold nights or after 11 PM.
Children are a special case. I became enamoured with astronomy at seven year old when I went to a star party and saw Saturn for the first time. I can clearly remember that night more than a half century later. I didn't know anything about telescopes except that I wanted one. By 9 I had built my first telescope, a rickety but workable refractor from war surplus lenses, mailing tubes, sliding tomato paste cans and slats of wood. If I met a youngster today with the same passion I had, my first suggestion is an adequate pair of binoculars. If the youngster already has these and wants more, generally I'd recommend a small Dobsonian mounted Newtonian telescope. I'd wait on computerized catadioptric telescopes until the youngster was a teenager.
How Much?
Prices for telescopes in relative terms have tumbled in the last two decades. However, a good telescope still is a pricy investment. Here is a point to consider
- Never waste money on second rate goods. Only the very rich can afford to throw
away expensive mistakes.
A quality telescope with limited features can cost about the same as a similarly sized gimcrack telescope loaded with dubious features.
Often price alone makes a decent pair of binoculars you best bet as a first telescope. Just remember that even ordinary binoculars if they have adequate to good optics will let your see the moons of Jupiter, the rings of Saturn (on a good night), craters and maria on our own Moon, galaxies, open and globular clusters, the vista of the Milky Way and comets.
When looking for the most for my dollar, make sure none of the following are neglected:
- apature
- quality optics
- sturdy mount
- quality eyepiece[s]
- vibration free
Notice that many things like what type of a telescope, what focal ratio, what type of mount and what electronic features never entered the list. From a cost/benefit viewpoint, they just aren't as important as the items on the list. For binoculars you might think you could skip a study mount and the need to be vibration free. Possibly this is true with small hand held but your image quality will degrade in direct proportion to magnification. Holding large objective binoculars still with your hands is impossible for more than a few minutes.
I own a telescope which claims to have a figure better than 1/20th the length of yellow-green light. However this telescope apature is only 90 cm. The quality of the optics of the small telescope exceeds the quality of the Meade 16" optics. Can I see more or more clearly than the 16"? Of course not! The 16" inch telescope has 22 times the light grasp because of its greater apature. The quality of the image is based on both the apature and the quality of the optics.
Some items on the list may be possible to construct for very little cost. I've seen perfectly sturdy and serviceable mounts made out of pipe fittings. Newtonian scopes can be supported by completely serviceable Dobsonian mounts made out of a few bearing and bushings and plywood scrap.
Don't necessarily buy your eyepieces from your telescope's manufacturer. Very inexpensive, but high quality eyepieces are being made by several small firms. Look in the magazines (Sky&Telescope or Astronomy) or serach the Internet.
One way to get a good deal more for your money if to buy someone's used telescope. Beware of "trendy" telescopes which suddenly have used versions flooding the market. They may indicate a large number of dissatisfied users. Sometimes estate sales put telescopes on the market at very low amounts since they do not know their value. Telescopes do not depreciate as rapidly as cars or household appliances. Whenever possible, get a commitment to star test the telescope before paying for it. You'll have to have patience, watch the online marketplaces (like AstroMart) and be ready to place you bid quickly. Other crafty would be telescope owners have learned this trick.
Which Telescope is right for me?
If you've read how telescopes work, the pros and cons of each type of telescope and mount, and you've answered the questions What? Where? When? Who? and How Much?, then it is time to consider which telescope is right for you.
The right telescope should start with good optics, sufficient aperture a sturdy mount, underestandable controls and a manageable size. Poorly figured optics, particularly if they have a fast focal lenth (under f/6), result in distorted images that will never satify you. If your telescope is too small for your needs, you'll get dim, washed out tiny images. I've never heard an astromers singing the praises of a wobbly tripod which vibrates in the slightest breeze although I've heard many a muttered curse at such mounts. If you are ready for sophisticated controls, wonderful but don't buy them if you are hopeless with technology. A 24" inch Dobsonian has a wonderful light grasp, but if you can't lift it or fit in your family car, it may be left at home too many nights.
By now you know that I strongly recommend binoculars as a first "telescope". Just a few twists of a knob or an eyepiece brings everything into focus. Add a solid tripod to support the binoculars and you have an excellent wide angle telescope. When your young astronomer is ready for more equipment, the binoculars will not be left behind. I use my binoculars whenever my telescope is out. Binoculars are measured by a pair of numbers n•mm. The value of mm (size of the lens) must be at least 35 mm, but 50 to 80 mm binoculars will allow you to see dimmer objects. The value of n (magnification) should be 7 or 8 for 35 to 50 mm binoculars but can be as much as 10, 15 or 20 for 70 mm or more binoculars. Wide angle fields of view are a plus for binoculars.
 For a
first telescope, your best value is a Newtonian telescope on a Dobsonian mount. These
telescopes are simple, rugged and give excellent views of the heavens. Dobsonians cost
$300 and $500 depending on features, the size of the mirror and the manufacturer. The
bases and tubes each weigh about 25-40 pounds.
 When
portability and rugged design is required, either because of it intended use or the your
intended astronomer is a youngster I'd suggest you consider a bowling ball type telescope.
This 4" telescope [base and tube] weighs about 10 pounds. Prices are in the $200 to $500
range depending on the manufacturer and the features.
I'm not going to recommend a telescope by brand name, but I do suggest that anyone looking for comparisons should look at the advertisements and products reviews which appear in the two most popular magazines Astronomy and Sky&Telescope. Back issues of these magazines can be found in the library and at FDO.
Buy Aperture not Magnification
One final warning, beware the high magnification sales gimmick. Any telescope can be given any magnification by simply using too powerful an eyepiece. Under the best possible conditions a telescope magnification cannot exceed 50 times the diameter of the objective (the biggest mirror or lens) measured in inches. Generally, 10 to 30 times the diameter works best. A refractor with a 2 inch lens can never be successfully magnified above 100. Most of the time a 20 to 60 power eyepiece is best. If the objective is measured in millimeters, convert to inches by dividing by 25.
More than any other single factor, increasing apature gains the most. I have a wonderful small Maksutov. I love it dearly. Yet I never saw Pluto or the moons of Uranus until I was able to look through a much larger telescope. If the light doesn't come into the telescope at sufficient brightness, no amount of magnification will let you see a dim object. What is even more surprizing, is the too small an apature means that increasing magnifications actually degrade images. Increased apatures with the same eyepieces yield greater magnifications without loss of image quality.
Low and high power eyepieces of the same type cost about the same to manufacture. Apatures prices rise much more rapidly than the size increase. Disreputable manufacturers have a great economic incentive to boost the eyepiece power rather than making a larger objective. Naive buyers may think they have a better telescope because of its high magnification, but they will be very disappointed in the image clarity.
Basic Optics
We need several concepts before we can proceed much further. Unfortunately some of the ideas which we need to explain focal length for example require ideas which won't be described until later. So at the risk of some circular definitions, I'll launch full steam ahead and back a few trips back to the dock to pick up late arriving concepts. I think it will all be clear soon.
Angles, Lengths and Ratios
The focal angle is determined by the cone of incoming rays at the eyepiece. Some objectives focus light into a very stubby cone ending in a blunt point. Other objectives focus light in a slender cone coming to a sharp point. The tip point of the light cone is called the focal point. Ideally all the light rays will come to a single intersection although irregularities in the mirror make this ideal impossible to achieve perfectly. Usually, an eyepiece or a camera will be placed just ahead of the focal point to allow an image to be formed.
The effective focal length is the distance from the objective to the focal point. However, this value is rather difficult to measure directly, so we compute it from the focal angle and the size of the objective.
focal length = objective size ÷ ( 2 sin [½ focal angle])
If the focal angle is 1° and the objective is 2", the effective focal length would be 57.3" .Similarly for a focal angle of 30° then with an 80 mm objective we would get a focal length of 600 mm.
The term effective focal length may or may not have anything to do with the physical focal length. My Questar has a effective focal length of 63" but the physical path from the meniscus lens to the eyepiece is less than 20" .The physical focal length is a meaningless measurement in this telescope because it has four optical surfaces which modify the shape of the light packet as it passes through the telescope. However my Astroscan 2000 has a effective focal length which is exactly the same as the physical focal length. In the Astroscan both focal lengths are 16".
Closely allied with the concept of focal length is the concept of focal ratio. The focal ratio is simply the ratio of the objective size to the effective focal length. For example, our Meade LX200 has a focal length of 4064 and an objective size of 16" or 406 mm. The focal ratio is written as f/10. Focal ratios with numbers below f/5 are considered to be wide angle or "fast" focal ratios. For a given eyepiece, a fast focal ration creates a very wide field of view but a low magnification. For example my Astroscan 2000 has a focal ratio of f/4 and is a wide angle telescope. Extended objects can be stunning but planets tend to be disappointing. The intermediate range of focal ratios extends to about f/13 or f/14. My Questar at f/18 is considered to be a long focus (or slow) telescope. It does a wonderful job with planets, but only the core regions of the Andromeda appear. It magnifies at the expense of field of view.
Focal ratios "speeds" were named by photographers. Photographers normally take photos when there is plenty of light by astronomical terms. Astronomers almost never have too much light. In photography a "fast" focal ratio means just what it say. The shutter closes very fast because a lot of light has enters quickly. A "slow" shutter speed is used when the camera lens reduces the amount of light which can enter the camera, requiring longer exposures.
The fastest focal ratios used by astronomers are around f1.5 for "traditional" telescopes. Some very specialized telescopes such as the Hobby-Eberly Azimuth Only Telescope are as low as f1.4. Many telescopes have an ability to alter their focal ratios. In their slowest configurations, focal ratios of f/30 or f/45 are not unusual. The Hubbell Space telescope has an option to run at f/98 and the Mayall Reflector on Kitt Peak can be configured in an prodigious f/190 focal ratio. [A simple refractor with a 4 meter objective and a f/190 focal ratio would have a tube almost a half mile long!]
I have read about an amateur astronomer wished to have a telescope optimized for planetary work. Eyepieces with good "eye relief" have lower magnifications unless the telescope has a very long focal length. This astronomer wanted the best of both worlds. He replaced a flat secondary mirror in an 8" Celestron by a hyperbolic mirror. This changed the focal ratio from f/6 to f/89. This radical change in the focal ratio was done without altering the physical focal length.
Only the effective focal length was enlarged. In effect, he multiplied the power of each of his eyepieces by almost 15 times without making the eye relief poorer. Of course, as a result, he has a telescope which has extreme tunnel vision. Looking through such a telescope is like trying to look through a one inch pipe which is seven and a half feet long. This modification was effectively a super Barlow lens. Perhaps the most common modification made to the focal ratio is the use of a Barlow lens. A 2x Barlow effectively doubles the focal length of a telescope.
Magnification
The magnification of a telescope is the focal length of the scope divided by focal length of the eyepiece. Typically eyepieces focal lengths are measured in millimeters. Convert your telescope's focal length [as adjusted by any focal length modifiers like Barlow lenses] to millimeters and form the ratio. This is the magnification. For example our Meade LX200 16" has a focal length of 4064 mm. Using our 56 mm eyepiece we get 73 as the magnification. Our 25 mm Plossl with a 2x Barlow results in a power of 325 diameters. Our 5 mm Plossl reaches the telescope's highest practical magnification of a bit more than 800 diameters.
Trying to magnify more than 50 [2] times the size of the objective measured in inches [millimeters] will stretch the image to a point of degraded images. Extreme over magnification will reduce contrast to faint shades of gray and will blur images to fuzzy blobs.
Lens and mirrors [collectively called objectives] collect light which is emitted or reflected from a distant object. They focus (squeeze) this light until it is small enough to fit through an eyepiece or other instrument. They operate in two differing fashions.
Mirrors
Photons [particles of light] from a distant object travels in parallel lines from the distant object in all directions. When a photon hits a mirror it bounces at exactly the same angle on the opposite side of the perpendicular. So if light hits at 20º left of the perpendicular, it will leave at 20º right of the perpendicular. We've all seen this in common household mirrors which invert our face left to right.
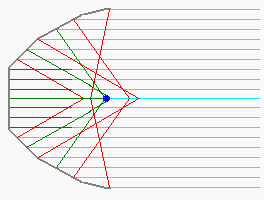 If we arranged a series of
mirrors titled at just the right angle, we could bounce light from a distant object to a
focus point. The central mirror is placed perpendicular to the incoming light. The next
mirror [on each side] would be placed so that it was tilted at the angle which bounces
light from incoming parallel rays to the focus. The next two mirrors would be tilted just
a bit more to achieve focus. The diagram to the left illustrates this.
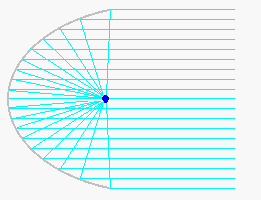
While this works fine for the center of each mirror (reflections shown in green), the rays to the right or left of each mirrors center either fall short or beyond the intended focus. By cutting each mirror in half and readjusting the angles, we will achieve a somewhat better focus. If we continue subdividing and adjusting long enough we will get billions of minuscule mirrors each wide enough for a single ray of light. This results in a curved surface that look like the diagram to the right
This 2 dimensional curve is a parabola. Its 3 dimensional counterpart is called a paraboloid. Astronomers tend to use the two words interchangeably.
The example shown is a mirror with an extremely "fast" focal ratio (down around f/0.7). The extreme curvature was used to keep the diagram understandable.
While this extremely fast parabola is impractical in a telescope, it's shape is fine for automobile headlights. Headlights are simply telescopes run "inside out". The filament is at the focus. When light rays shine onto the mirror they are reflected outwards towards infinity. Headlights benefit from irregularities that would ruin a telescope. The irregularities broaden and scatter the light rays enough that the whole road is illuminated rather than a shaft a few inches in diameter.
Two Tales
Before we discuss lenses, let me tell you a couple of stories.
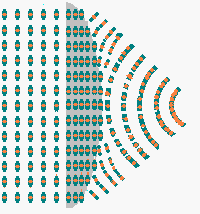 A battalion of infantry has been arrayed
by it officers into parallel lines rank after rank. Each soldier in this battalion has
been ordered to stand shoulder to shoulder with adjacent buddies. No soldier may turn
except to keep his shoulders aligned with his comrades. Each soldier in this battalion is
equally fit so each moves at the same maximum speed over the flat terrain. A battalion of infantry has been arrayed
by it officers into parallel lines rank after rank. Each soldier in this battalion has
been ordered to stand shoulder to shoulder with adjacent buddies. No soldier may turn
except to keep his shoulders aligned with his comrades. Each soldier in this battalion is
equally fit so each moves at the same maximum speed over the flat terrain.
One day as the battalion advances it comes upon a very sticky bog. This bog bulges in the middle and tapers off to a point on either side. As the line encounters the bog, its speed abruptly drops. The outer soldiers break free after a brief moment, but the central soldiers must continue to work their way across the bog for an extended time How can the line stay shoulder to shoulder when the outer soldiers are only delayed a step or two while the central soldiers are delayed many steps? There is one and only one way - the outer soldiers must take a curved path, bending towards the center. If the bog is carefully designed, it is possible to cause the bend in the line to head each soldier towards a common point. Once free of the bog, the rule which says no soldier may turn except to match shoulders applies. The result is the previously straight lines are now curved inward. Well so much for our mythic battalion and its encounter with a line bending bog. What if anything does this have to do with lenses bending light? Well actually [by analogy] quite a lot. Let me tell the story again with the names changed to confuse the innocents. |
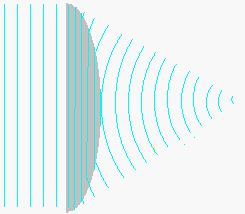 A beam of light has been arrayed by it
emitters into parallel wave fronts rank after rank. Each photon in this beam by its very
nature is aligned in a wave front with its adjacent photons. No photon turns except to
maintain the integrity of its wave front. Each photon in this beam is identical so each
moves at the same maximum speed [the speed of light] through a vacuum. A beam of light has been arrayed by it
emitters into parallel wave fronts rank after rank. Each photon in this beam by its very
nature is aligned in a wave front with its adjacent photons. No photon turns except to
maintain the integrity of its wave front. Each photon in this beam is identical so each
moves at the same maximum speed [the speed of light] through a vacuum.
One day as the beam advances it comes upon some transparent glass. This glass bulges in the middle and tapers off to a point on either side. As each wave front encounters the glass, its speed abruptly drops. The outer photons break free after a brief moment, but the central photons must continue to work their way across the glass for an extended time. How can the wave front stay intact when the outer photons are only delayed a moment or two while the central photons are delayed many moments? There is one and only one way - the outer photons must take a curved path, bending towards the center. If the glass is carefully designed, it is possible to cause the bend in the wave front to head each photon towards a common point. Once free of the glass, the rule which says no photon may turn except to maintain wave front integrity applies. The result is the previously straight wave fronts are now curved inward. The above analogy may strike you as inaccurate. How can glass be sticky in a way which is anything like the mud and brambles of a bog? Doesn't light always travel at 186,000 miles per second? Well, no - that speed occurs when light travels in a vacuum (flat terrain). When light encounters atoms it usually simply is absorbed (it becomes permanently mired) in the material. Most gasses, many crystals some liquids, glass, some mineral and gems are transparent. Light behaves a little differently in transparent materials. |
Lenses
In transparent materials photons have a reduced speed of light. This reduction can be very small (in materials like air) or more than half the speed of light in materials like diamonds. [This is analogous to a soldier being mired in mud.]
The shape and the density of a lens make all the difference in the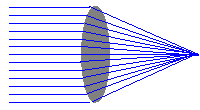 focusing nature of the lens. We've seen in our
example by analogy of a glass lens focusing light to a common point. Focusing only takes
place when there is a difference in the index of refraction in the two materials.
Generally denser materials have higher indices of refraction. A vacuum has an index of
refraction of zero. Air has a very low but non zero index, while water, glass and diamond
have ever increasing indices. It is the very high value of diamond's index of refraction
that accounts for its scintillating luster. Glass is a material which can have widely
varying indices of refraction. Some glasses can be given high indices and other lower
values.
What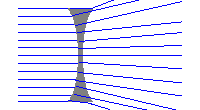 isn't commonly recognized
is that lenses can be negative rather than positive. Lenses which are concave will
defocus light. There are more uses for negative lenses than might be suspected. They are
used in "field flatteners" which allow photographs and CCD images to be formed without the
fuzzy loss of information at the edge of the image. This type of lens is the basis of
several attachments to telescopes such as Barlow lenses whose purpose is to extend the
light path effectively multiplying the power of an eyepiece.
Suppose that you had a solid block of glass with an air pocket in the
shape of lenses. The effect of these lenses on focusing is reversed because you travel
from a denser medium through a region of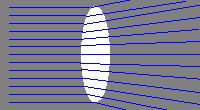
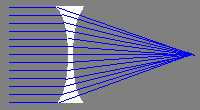 lower density. At first this might seem like a
curiosity, but this attribute holds just as well when you passes between disk of glass of
varying densities. As we will see this allows us to correct a problem called chromatic
distortion. In every day terms, lenses are like prisms. The spread out the spectrum of
light creating a rainbow halo around deep space objects that emit more than a single
frequency of light [which is just about everything!]
Single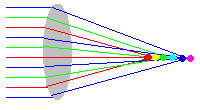 lens scopes cannot bring
every color to a same focal plane. Harkening back to our poor soldiers slogging through
the bog, we discover that different kinds of soldiers cross the bog at differing angles.
Reds and oranges bend too sharply passing inwards of the desired focal point; yellows and
greens focus as desired; and blues and violets bend too slowly passing beyond the focal
point. When electrons in glass atoms interact with photons, they re-emit the energetic
photons first (violets and blues), holding onto yellows and greens a bit longer and
holding onto red and oranges longer yet.
There didn't seem to be any way to correct this, so early telescopes either had colored halos or they had very long focal lengths. [The bending effect is least when the curve in the glass is very shallow which in turn leads to very long focal lengths].
Opticians experimented with alternative glass formulations.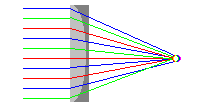 They discovered that for hard glasses distorted
light more than softer glasses. By combining a soft convex lens (an outward bulging
focusing lens) with a hard concave lens (an inward bulging defocusing [negative] lens), it
was possible to perfectly correct for two colors and almost perfectly correct for the
remaining colors. As long as local lengths were kept above f/6 or so, little or no color
halo will be seen. These types of objectives are called apochromatic.
Eyepieces
The design of eyepieces is a very advanced state of the art. The problems are not so much focusing a beam of light as it is matching the telescope to the human eye. Effective eyepieces must:
- distribute light evenly over most of the retina's surface (to avoid a narrow angle viewing circle).
- transmit the maximum possible light from the telescope through the small opening of dark adapted pupil [about 7 mm or ¼"].
- faithfully represent the full spectrum from red through violet.
- appear as an optically flat field.
- be in focus over the entire surface with little or no distortion.
However the earliest eyepieces were nothing more than positive and negative lenses placed on one side or the other of the focal plane. Single lens eyepieces have all sort of problems including distortions, narrow fields of views and color aberrations. Never-the-less they work after a fashion. The eyepiece of my very first telescope was a glass hemisphere glued at the edges to a sliding tube. Believe it or not, this eyepiece was good enough to see the rings of Saturn and the Moons of Jupiter.
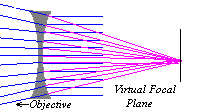 Galileo's first telescope used
a negative lens as its eyepiece. The negative eyepiece straightened the convergence of
the light rays focused by the objective lens allowing the rays to enter the eye in
parallel. For a negative lens to work, it must be placed ahead of the focal plane
(between the objective and its focal plane). Try this with a large positive lens and a
smaller negative lens.
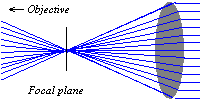 About five years after Galileo
made his telescope, Hall discovered that placing a positive lens behind the focal plane
accomplished the same thing as a negative lens. For a positive lens to work, it must be
behind the focal plane. Try an experiment with two positive lenses. Try different
curvatures if you have a selection. You will probably find that the longer the focal
ratios, the better quality an image is produced.
The effects of chromatic distortion is not limited to telescopes with objective lenses. The problem can occur if poorly designed eyepieces are used. This essay will not cover eyepieces in much detail, but I'd like to make a few points about then before we continue. Even with a mirror objective, which in theory never suffers from chromatic distortion, a bad eyepiece can inject halos just as the light is about to enter your eye. I have two eyepieces which have the same focal length. It would seem that they should be equally clear but that is not the case. The cheaper eyepiece has subtle chromatic distortions which result in blurred images even though halos are not usually noticeable.
Eyepieces are the interface between the telescope and the viewer. Eyepieces are measured in millimeters. Assuming the same design, the lower numbered eyepiece will show a narrow field but with very high magnification. A high numbered eyepiece will have a wide field of view but at lower magnification. One feature of eyepieces which is often overlooked by "newbies" is that low numbered eyepieces require the viewer to almost place his eye on the eyepiece lens. Higher numbered eyepieces allow the user to move his eye farther back from the lens. This eye relief is a crucial design element for good viewing.
The diameter of the eyepiece is important for the quality of the image. However, the desirable 2" eyepieces cannot be manufactured in lower sizes because of the eye relief problem. If you must press your eye near the lens, all the surface area of the lens on either side of your eye's pupil is wasted. All of our lower numbered eyepieces are 1.25" in diameter. Our very smallest eyepiece (5 mm) is really not even a 1.25" even though it is in a 1.25" tube, the area of the lens is just a few millimeters across.
Appendix 1 Telescope Types
REFLECTORS            Primary      Secondary
===================== ==========   ===========

Cassegrain (1)        concave-     convex-
                      paraboidal   hyperbolic

Couder                concave-     concave-
                      aspherical   ellipsoidal

Dall-Kirkham          concave-     concave-
                      ellipsoidal  spheroidal

Gregorian (1&2)       concave-     concave-
                      paraboidal   ellipsoidal

Newtonian             concave-     flat-
                      paraboidal   diagonal

Newtonian-Cassegrain  concave-     flat-
                      paraboidal   reverse

Ritchey-Chretein      concave-     convex-
                      hyperboidal  hyperboidal


OFF-AXIS REFLECTORS   Primary      Secondary   Tertiary
===================== ==========   =========== ===========

Herschellian          concave-     none        none
                      paraboidal

Prime Focus (3)       concave-     none        none
                      paraboidal

Schiefspiegler        concave-     concave-    none
                      spheroidal   spheroidal

Tri-Schiefspiegler    concave-     concave-    concave-
                      spheroidal   spheroidal  spheroidal


CATADIOPTRICS         Primary      Secondary   Corrector
===================== ==========   =========== ==================

Maksutov              concave-     convex-     double concentric
                      spheroidal   spheroidal  spherical meniscus

Schmidt-Cassegrain    concave-     convex-     quadratic corrector
                      spheroidal   spheroidal  plate (w curve)

Schmidt (4)           concave-     none        quadratic corrector
                      spheroidal               plate (w curve)

Meniscus Schmidt (5)  concave-     none        quadratic corrector
                      spheroidal               plate (w curve)

Solid Schmidt (6)     concave-     none        quadratic corrector
                      spheroidal               plate (w curve)

Super Schmidt (7)     concave-     none        quadratic corrector
                      spheroidal               plate (w curve)

Baker-Schmidt (8)     concave-     convex      quadratic corrector
                      spheroidal   aspheroidal plate (w curve)


REFRACTORS            Primary (9)  Corrects
===================== ===========  ======================================

Achromatic            2  lenses    2 colors perfectly

Apochromatic          3  lenses    3 colors prefectly (~panchromatic)

Astrographic          1  lens      monochrome (usually used with filters).

Binoculars            1+ lens      ~panchromatic

Galilean (10)         1  lens      severe color distortions

Monoculars            1+ lens      ~panchromatic


Notes:

(1)  A variant on this telescope avoids  a main mirror hole by including  a
     flat diagonal tertiary mirror, frequently out the declination axis.

(2)  Gregorian telescopes have erect images but require long focal lengths.
     Image erectors have largely replaced these telescopes.

(3)  A  camera  or  observer  sits  at  main mirror focus, constituting the
     central obstruction.

(4)  All Schmidt telescopes (except  a Schmidt Cassegrain) are cameras with
     the photographic plates mounted in the body of the optical tube.

(5)  A meniscus  Schmidt telescope  places a  meniscus lens  at the primary
     mirror to achieve a very wide field of view and a short focal length.

(6)  A solid Schmidt telescope carves the optical surfaces out of a  single
     conical glass frustrum.   The forward  end behaves as  a corrector and
     the silvered  rear end  as a  spherical mirror.   Extremely  fast wide
     field  telescopes  result  with  focal  ratios  as low as f/0.35.  [In
     theory,  such  a  telescope  created  out  of  diamond  would approach
     f/0.02!]

(7)  The  super  Schmidt  surrounds  the  corrector  plate  with  spherical
     meniscus lenses.  It achieves a very fast telescope (to f/1.0)

(8)  Unlike all  other Schmidt  cameras, the  Baker-Schmidt's extra  mirror
     causes the photographic to face forward.

(9)  All primary lenses for  refractors are plano-convex or  convex-convex.
     Good  quality  primary  lenses  are  typically  combined  of   several
     densities of glass to reduce color abberation to a minimum.

(10) Galilean telescopes were are very  poorly color corected.  They  use a
     negative  concave  lens  as  an  eyepiece.   Today such telescopes are
     limited   to   opera   glasses,   lorgnettes  and  children's  plastic
     binoculars.

(11) A Meridian Transit is any telescope fixed in the North/South meridian.

(12) A Siderostat is a  flat mirror which rotates  bringing a field into  a
     fixed telescope.

(13) A Zenith telescope  is a meridian  telescope fixed vertically  as well
     horizontally.
Appendix 2 Eyepiece Types
Lipershy's First Eyepiece
The very first eyepiece was created by Hans Lipershy in 1608-1609 out of standard spectacles (eyeglasses). It was essentially a positive lens, but it wasn't understood very well. A formal version of this waited for about 5 or 6 years when Hall created a formal eyepiece.
Galilean or NegativeThis eyepiece (also called a negative eyepiece) was created by Galileo Galilei in 1610. It suffers just about every known optical defect except that it does provide an upright image. It must placed outside the focal plane to work. Oddly enough, this design is still used a great deal in inexpensive opera glasses, lorgnettes, and children's "binoculars". | |
 |
PositiveThis positive eyepiece (as such) was created by [John?] Hall about 1615. It sole redeeming feature is it got people interested in telescopes and led to ever better designs. About the only "telescopes" which use this design today are people expermenting with optical labs that can be bought from companies like Edmund's Scientific. |
 |
HuygensThis eyepiece, created by Christian Huygens in 1703, is an inexpensive eyepiece, simply designed and constructed. It does not perform well below f/10, suffering various aberrations if used with faster telescopes. |
 |
MittenzwayThe Moritz Mittenzway modification of the Huygens design appeared around 1865. It replaces the field plano convex lens with a meniscus lens. It extends the Huygens design down to about f/8. |
 |
RamsdenJesse Ramsden created this eyepiece in 1782. It has very poor eye relief (your eye must be held very close to the lens), and suffers from both chromatic and spherical aberrations. However this design was free of coma and led to other much more sucessful designs, the Kellner and later the Plossl (and Super Plossls). It is extremely simple to make and is very inexpensive. It appears in a great many "department store specials". Frequently replacing a Ramsden eyepiece with a more modern design results in dramatic improvements in inexpensive telescopes. |
 |
KellnerCarl Kellner modified the basic Ramsden design to create this eyepiece in 1849. In many respects this can be considered the first "modern" eyepiece. The major change is the replacement of the eye lens with a achromatic cemented doublet. It has good eye relief. It is relatively free of all serious aberrations. It works well even with telescope systems as fast as f/6. Its chief drawback is a tendency to form "ghost" images Various improved versions are on the market today such as the Edmund's RKE series of moderately priced eyepieces. |
 |
PlosslSimon Plossl modified the Kellner design to create this eyepiece in 1860. This design has two achromatic doublets. It reduces aberrations even more than the Kellner and is able to be used with telescopes as fast as f/4. Plossls and Super Plossls remain work horses of many systems including our own Meade LX200 16" SCT. |
 |
OrthoscopicErnst Karl Abbe created the orthoscopic eyepiece in 1880. The major design change was the introduction of a cemented triplet field lens. This design was assumed to be the very best until the twentieth century combining very good eye relief with good freedom from coma and various aberrations. Cost was moderate and these eyepieces continue to be popular until the present. For their time one of the most remarkable features of the orthoscopic design was a field of view from 30deg; to 50°. |
 |
Erfles and KonigsHeinrich Erfle created this design in 1917. Its great advantage was an extraordinarily wide field of view (typically 60° to 70°) over earlier eyepieces. It suffers some loss of image quality at the edges of its view. In the 1930s(?) Albert Konig extended this design to shorter focal lenths. |
 |
UltrawidesDesigning optics has always been a tedious task. Opticians have long understood how to design an optical system from theory, but in practice, complex optics with many elements required far too much time to allow many alternative designs to be tried. Actually grinding the lenses and seeing if they behaved as expected was even more difficult. Running the calculations on computers was possible, but it required many hours of main frame time on a circa 1975 system to establish a lens. There did not seem to be any market for these improved eyepieces. Personal computers changed this market place in two dramatic ways. It created a whole generation of new computer designed telescopes (Questars, Celestrons and later Meades as well others). It also allowed the computer intensive ray tracing programs to be run economically. Suddenly it became practical to design 5, 6, 7 or even 8 element optical systems where the individual elements were no longer restricted to simple plano convex and plano concave units. Exotic combinations of glass were tried on the computers and coatings were simulated. From this has come a wide variety of new eyepieces with extraodinarily wide fields of view, excellent eye relief, freedom from undesirable side effects and managable costs (although none of these super eyepieces would be called cheap). I'll point out The Nagler family of eyepieces are expensive, complex and superlative in design and image quality. They were first created by Albert Nagler during the 1980sand have become the industry standard of excellence. Typically these eyepieces have 7 or 8 lenses of various shapes and formed from as many as 4 differing densities of glass. These eypieces work well at focal lenths as fast as f/4, and superbly at slower focal lenths. The worst drawback of Naglers (like other eyepieces with five or more elements) is that light is lost at each interface reducing contrast and brightness. |
 |
MonocentricsThis eyepiece seems to have been created by Robert Tolles which would make it a 20th century creation. This eyepiece is a specialty eyepiece with an unsually narrow acceptable image. It is completely free from "ghosts" which plague other eyepieces when looking at extremely bright objects. As such it is very good for examining planets and for spliting close doubles. |
Final words on eyepieces
Have I mentioned your favorite eyepiece? Perhaps it only appears that I have missed you. Don't confuse the manufacturer with the design. When we talk about Lumicon, Orion, Panoptic, TeleVue, University or Brandon eyepieces we are talking about a manufacturer. Most of these manufacturers create many of the type of eyepieces we have mentioned above. About the only type of eyepiece that I know about which is not mentioned is a zoom eyepiece. I honestly just don't know very much about them except what they do. Typically they behave as if they were a whole set of eyepieces that ranged over approximately a 3 fold range of magnifications. For example, our zoom ranges from 8 to 24 millimeters.
Barlow lenses are not eyepieces. Strictly speaking they are attachments of a telescope (not its eyepiece). These lenses are acromatic diverging (convex) elements. They increase the effective focal length of the telescope. Since magnification is the focal length of the telescope divided by the focal length of the eyepiece, increasing the telescope's focal length has the effect of increasing the magnification by the same factor.
Appendix 3 Snell's Law
If your are not familiar with trigonometry, you may wish to skip this section.
Around 1620 Willibrod Snell updated some ideas which had been around since Claudius Ptolomy in 140 BC. Both men were trying to explain why light appears to bend as it passes frtom one material into another. Snell's Law relates the angle of incidence of a light ray to its angle of refraction when a ray passes from one medium to another. It is:
Ni sin θi = Nr sin θr
The values of N for each substance must be established by testing. N is precisely 1 for a vacuum, and just slightly greater than 1 for air. Water is about 1.33; flint glass is about 1.61 and diamond is about 2.42.
The direction of the "bending" is such that the ray bends toward the normal when leaving a material with an index of refraction lower than the material being entered. The reverse is true: the direction of the "bending" is such that the ray bends away from the normal when leaving a material with an index of refraction higher than the material being entered.
The angle θ is the angle between the ray of light and the "normal" line, an imaginary line perpendicular to the boundary between the two materials at the point of entry. As an example, consider a shaft of light entering a calm pond at precisely 45o. Experience tells us that anything breaking the surface of the water seems to bend from a straight line to one angled more steeply. If you have never tried this experiment, stick a pencil at an angle into a glass of water. It will seem to bend.
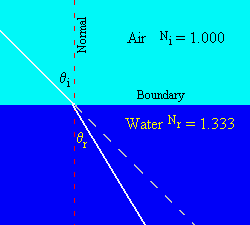 Applying Snell's Law,
we can calculate the exact angle of the bend:
Ni sin θi = Nr sin θr
becomes
1.0 sin 45o = 1.333 sin θr
which evaluates as
θr = sin-1 [1.0(0.7071)/1.333] = 32.0o
Snell's law can be repeated multiple time to calculate the direction a
ray of light will travel as it passes between material of differing densities when the
boundaries are complex shapes. For example, in a flint glass lens, the surface is
generally curved. The curve on one side of the lens may not match the curve on the other
side of the lens. No matter. Treat each boundary condition by itself and you will arrive
at the correct result.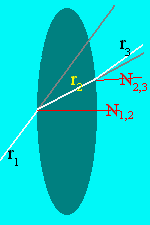
In the lens at the left, light ray r1 hits the lens at a sharp angle. If no refraction took place it would continue along the "gray path". Since flint glass has a higher index of refraction than air, the ray bends toward the normal line N1,2 creating the ray r2 which travels across the glass. It hits a point where the normal line N2,3 tilts up slightly. Because we now are entering air which has a lower index of refraction than glass, the ray bends away from the normal. Notice that this means it also bends up from the "gray" path which is where it would have gone without refraction. The final ray r3 ends up being bent even more obliquely than the initial ray r1.
By tracing a large number of rays entering and leaving, it is possible to determine exactly where each ray will end up. By judicious tinkering with the shape of the glass, it would be possible to have a2l rays parallel to the central normal line focused at a point on the exiting central normal line. This is exactly what we would desire for a telescope objective. Ray tracing a complex shape is simple in concept but requires prodigious computing. Today all such ray tracing is done by computer programs.
A complication which is not addressed by Snell's Law directly is that the red end of the spectrum has a lesser index of refraction than the violet end of the spectrum. For example, in flint glass, if red light focuses at a distance f then violet light will come to a focus at about 59/60f. This problem is handled by tracing a variety of different wavelengths each with its own index of refraction. By very careful adjustment of the materials (for example using two differant kinds of glass), it is possible to largely correct color aberation.
When the inverse sine function has an argument outside the range -1 to 1, this indicates a point where the light does not exit one or the other media. An internal reflection occurs.
